Information on NIBP Monitoring
- Non-invasive blood pressure monitoring is used for routine monitoring of the blood pressure on an extremity.
- The systolic, diastolic, and mean blood pressure values are recorded as measured values and displayed on the screen as a numerical value in mmHg.
Preparing for NIBP Monitoring
- Select the NIBP cuff appropriate for the patient’s upper arm or thigh girth.
- If required, connect the NIBP cuff to the NIBP hose.
- Apply the selected NIBP cuff to the patient’s exposed upper arm or thigh, ensuring the “INDEX” arrow printed on the inside of the cuff fits within the designated “RANGE” area, also printed on the NIBP cuff.
- The marking “ARTERY” printed on the inside of the cuff is aligned centrally and with the arrow pointing down to the arteria brachialis.
- Ensure a snug fit.
- The lower edge of the NIBP cuff should be positioned approximately 2 cm above the crook of the arm.
- The NIBP cuff should not exert any pressure on the blood vessels.
NIBP Interface Screen
The NIBP mode and interface screen is accessed by pressing the NIBP soft key
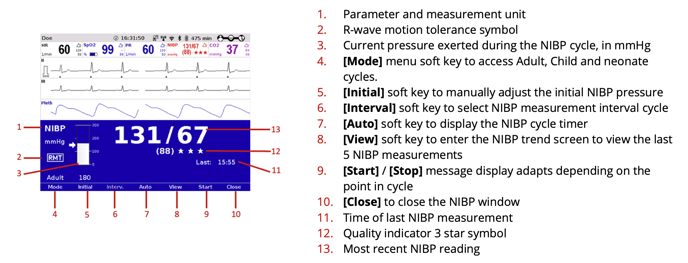
NIBP Numeric Fields
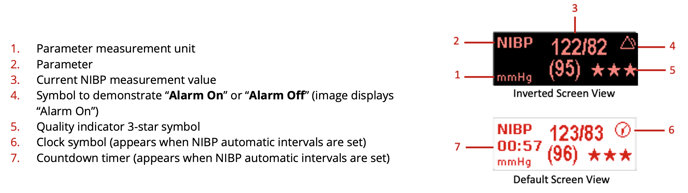
NIBP Quality Indicator
The quality indicator consists of 3-star symbols which indicate good measurement quality when filled and poor measurement quality when displayed as an outline.
If the quality indicator displays no or just 1 star, check the fit and position of the cuff and correct.
R-Wave Motion Tolerance (RMT)
RMT uses the 4 Lead ECG signal to detect artifact during the NIBP measurement by comparing the R-time with the pulse waves.
Performing NIBP Measurements
Before commencing the NIBP measurement, ensure that the selected initial pressure is appropriate for the patient. Adjust the initial pressure of the monitoring to approx. 30 mmHg above the expected systolic value or use the default settings.
Individual NIBP Measurements
- In monitoring mode, press the [NIBP] soft key
- Press the [Mode] soft key repeatedly until the required mode “Adult”, “Child” or “Neonate “ appears
- Press the [Start] soft key to commence the individual measurement
- For the measurement to be performed, the cuff will inflate and then deflates
- Press the [Stop] soft key to interrupt the measurement mid-cycle, if required
The soft keys will be greyed out immediately after the measurement has been taken. Another measurement is possible after 5 seconds have lapsed.
Automatic Interval NIBP Measurements
- In monitoring mode, press the [NIBP] soft key
- Press the [Mode] soft key repeatedly until the required mode “Adult”, “Child” or “Neonate “ appears
- Press the [Auto] soft key
- Adjust the interval times by repeatedly pressing the [Interv.] soft key, or leave the setting at the default value if appropriate
- Press [Start] to commence the interval cycle
During the first interval measurement, the inscription above the [Auto] soft key displays four dashes. After that, a countdown timer will display the remaining time until the next interval measurement. This countdown is also displayed in the numeric field below the NIBP value.
A clock symbol alternates with the alarm symbol, indicating that the interval measurement is active, and that an automatic measurement is being prepared.
Use the link below for a downloadable copy of this information: